Garlic bread is a timeless favorite, an essential companion to many meals, especially pasta dishes. But what if I told you there’s a quicker, easier, and even crispier way to enjoy this classic side dish? Enter the Air Fryer Garlic Bread—a recipe that guarantees golden, crispy perfection with the rich flavors of butter and garlic, ready in just five minutes! Whether you’re preparing for a pasta night or simply craving a quick snack, this recipe will quickly become a household staple.
Why Choose Air Fryer Garlic Bread?
Garlic bread baked in the air fryer is an absolute game-changer. The powerful air circulation ensures that the bread gets crispy on the outside while staying soft and fluffy on the inside. Unlike the traditional oven method, the air fryer significantly cuts down the cook time, making this recipe perfect for those busy nights when you need a side dish fast. Plus, the results are consistently amazing, with that delightful crispy texture and the rich, aromatic taste of garlic and butter in every bite.
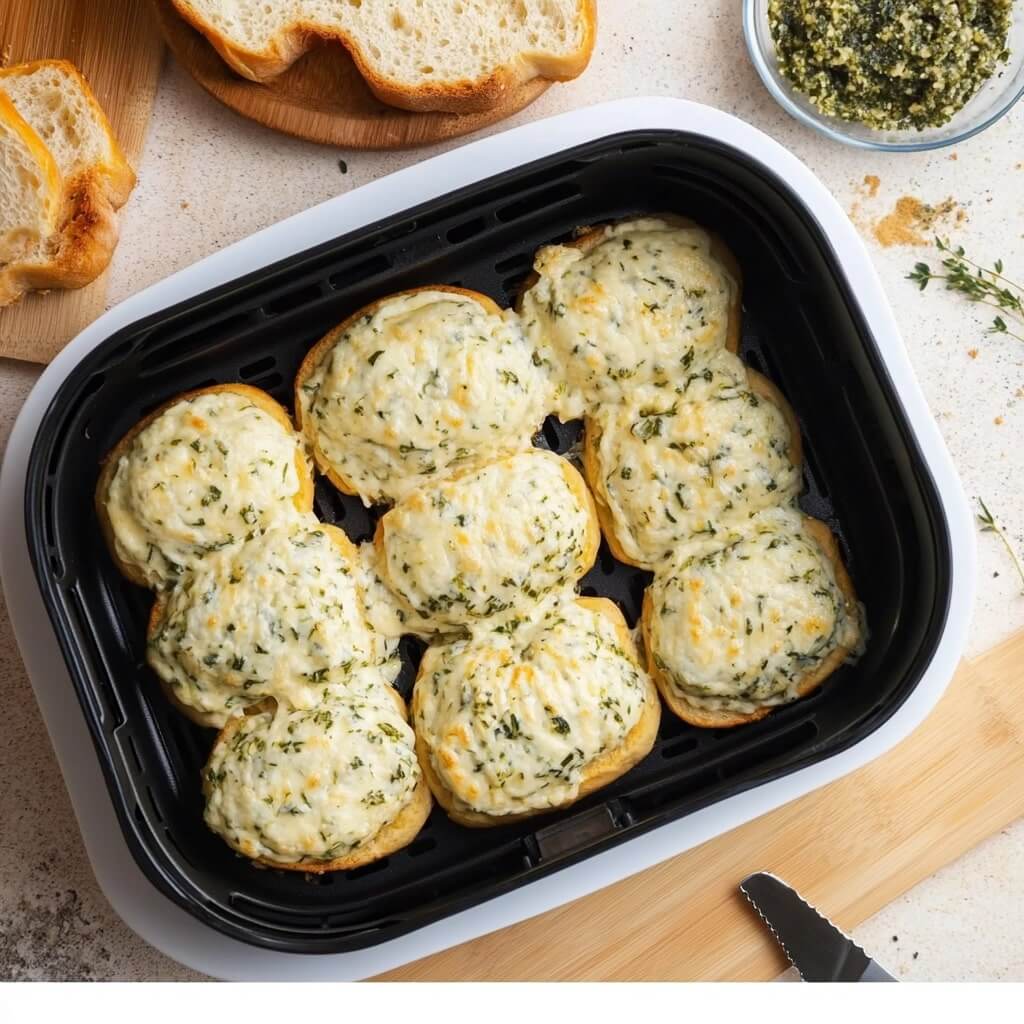
But that’s not all—this method also offers versatility, allowing you to make garlic bread from scratch or use frozen bread for a quick fix. Want cheesy garlic bread? No problem. You can easily add cheese for an extra indulgent treat.
Why You Should Make Air Fryer Garlic Bread
There’s a reason Air Fryer Garlic Bread is such a popular recipe: it’s quick, easy, and absolutely delicious. If you’ve ever craved garlic bread but didn’t want to wait around for the oven to preheat or deal with the mess, the air fryer is your new best friend. It gives you the crispy, golden texture of traditional garlic bread in a fraction of the time.
Speed and Convenience
The main selling point of this recipe is how fast it is. Traditional garlic bread in the oven can take 15-20 minutes. With the air fryer, you’ll get the same amazing results in just 5 minutes. This makes it a perfect addition to any meal, especially on those nights when you need something quick and satisfying.
Crispiness Without the Oil
The air fryer works its magic by circulating hot air around the food, which helps to create that signature crispy outer layer without needing to deep fry or use excessive amounts of oil. The result is a healthier, yet still incredibly tasty, garlic bread.
No Need for Frozen Garlic Bread
While it’s convenient to grab a frozen garlic bread from the store, nothing beats the homemade version. Not only does this air fryer recipe let you make fresh garlic bread from scratch, but you can also use frozen garlic bread as a shortcut if you’re in a hurry. No matter what kind of bread you choose, the air fryer will give it that golden crunch everyone loves.
A Versatile Side Dish
Garlic bread isn’t just for pasta nights! You can serve it with soups, salads, or even use it as a base for a quick snack. Add cheese or other toppings to customize it to your taste. The versatility of Air Fryer Garlic Bread means it can complement almost any meal.
Customization Options
Feel free to get creative with this recipe. You can adjust the garlic, butter, or cheese to your liking. If you like your garlic bread extra garlicky, use more minced garlic or even add a dash of garlic powder. For a cheesy garlic bread experience, layer on the mozzarella before air frying.
Ingredients You’ll Need
To make Air Fryer Garlic Bread, you don’t need many ingredients. In fact, this recipe can be whipped up with basic pantry staples. Here’s what you’ll need:
• Baguette or French bread – A sturdy, crusty bread provides the best base for your garlic butter spread. You can also use ciabatta or sourdough for a twist.
• Butter (Salted or Unsalted) – Softened butter is the key to spreading smoothly and achieving a rich, buttery flavor. You can use salted butter for extra flavor or opt for unsalted butter if you prefer more control over the seasoning.
• Garlic (Freshly Minced) – Fresh garlic is essential for that aromatic kick. Avoid using garlic powder, as it won’t provide the same depth of flavor.
• Fresh Parsley – Finely chopped parsley adds a touch of color and freshness to your garlic bread. Dried parsley works in a pinch, but fresh is always better!
• Parmesan Cheese (Optional) – For that perfect crispy golden finish, a sprinkle of grated Parmesan adds both flavor and texture.
Ingredients for Air Fryer Garlic Bread:
- 1 French baguette (or any crusty bread like ciabatta or sourdough)
- 1/2 cup salted butter (softened to room temperature)
- 1/4 cup fresh garlic, minced (about 4-5 cloves)
- 1 teaspoon fresh parsley, finely chopped (or 1/2 teaspoon dried parsley)
- 1/4 cup parmesan cheese (optional, but recommended for a cheesy touch)
Step-by-Step Instructions for Air Fryer Garlic Bread
Now that we have all the ingredients, let’s walk through how to make this simple yet delicious Air Fryer Garlic Bread. Whether you’re a novice in the kitchen or a seasoned cook, these easy-to-follow steps will guide you toward a perfectly crispy garlic bread every time.
Step 1: Prepare the Garlic Butter
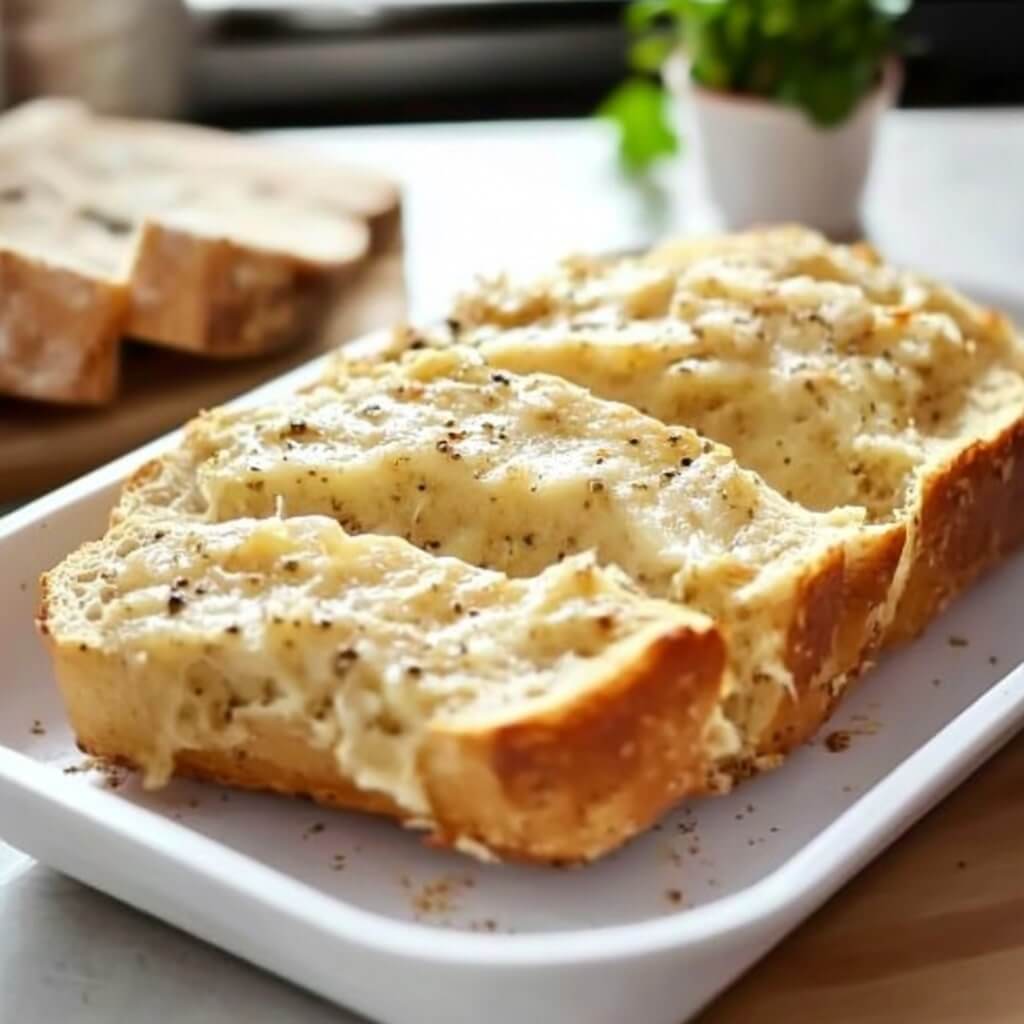
Start by making the garlic butter mixture. In a bowl, combine softened butter, freshly minced garlic, chopped parsley, and grated Parmesan cheese (if using). Mix everything until the garlic is evenly distributed throughout the butter, and the mixture becomes smooth and creamy.
Step 2: Slice the Bread
Next, slice your baguette (or any bread of your choice) into 1 to 2-inch thick slices. The thicker the slice, the more substantial the garlic flavor and butter coverage. You can even slice the bread diagonally for a more rustic look.
Step 3: Spread the Garlic Butter
Generously spread the garlic butter mixture onto each slice of bread. Be sure to cover the entire surface to ensure that every bite is bursting with flavor. Don’t skimp on the butter—this is where the magic happens!
Step 4: Preheat Your Air Fryer
Preheat your air fryer to 350°F (180°C). Although not all air fryers require preheating, doing so will help ensure even cooking and crispiness.
Step 5: Air Fry the Garlic Bread
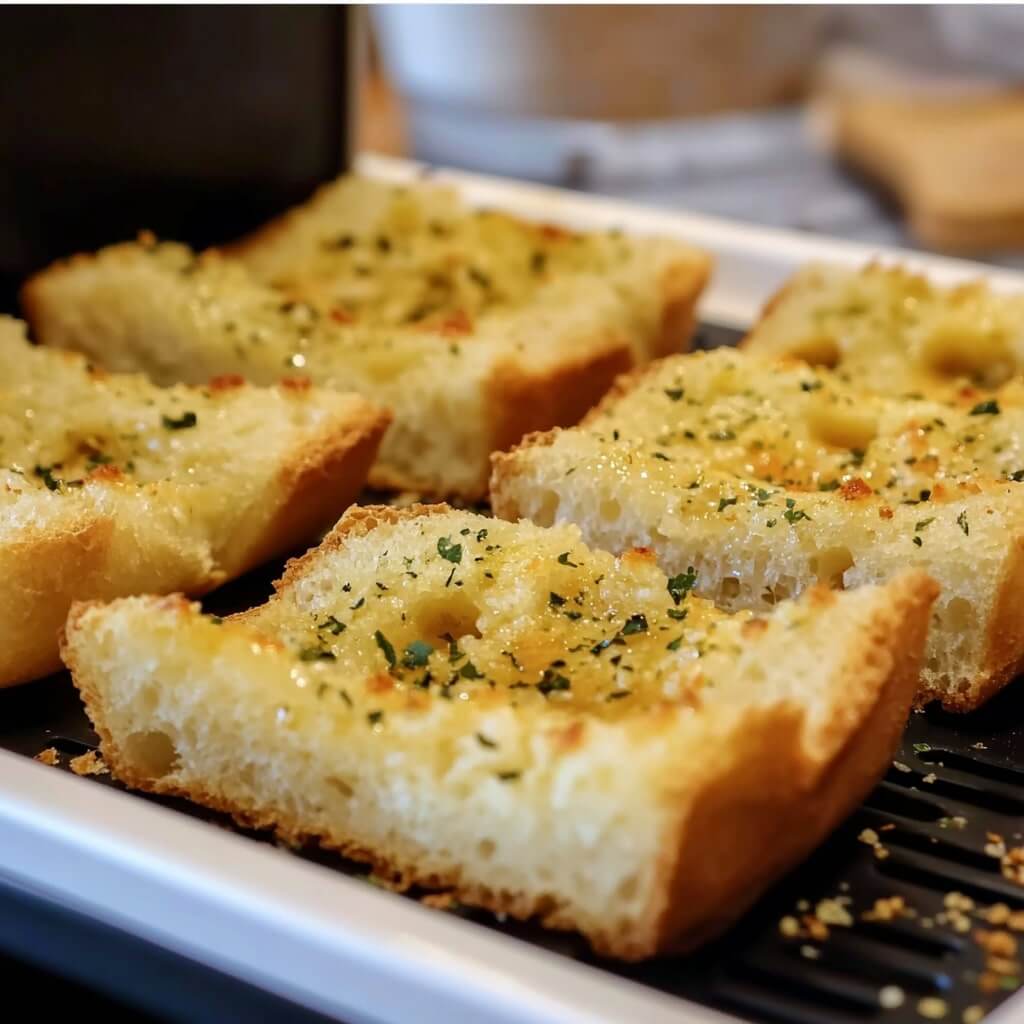
Place the prepared slices of garlic bread in a single layer in the air fryer basket. Depending on the size of your air fryer, you may need to cook in batches. Air fry the bread for 4 to 5 minutes or until the bread is golden and crispy. Keep an eye on it towards the end to prevent overcooking.
Step 6: Serve and Enjoy
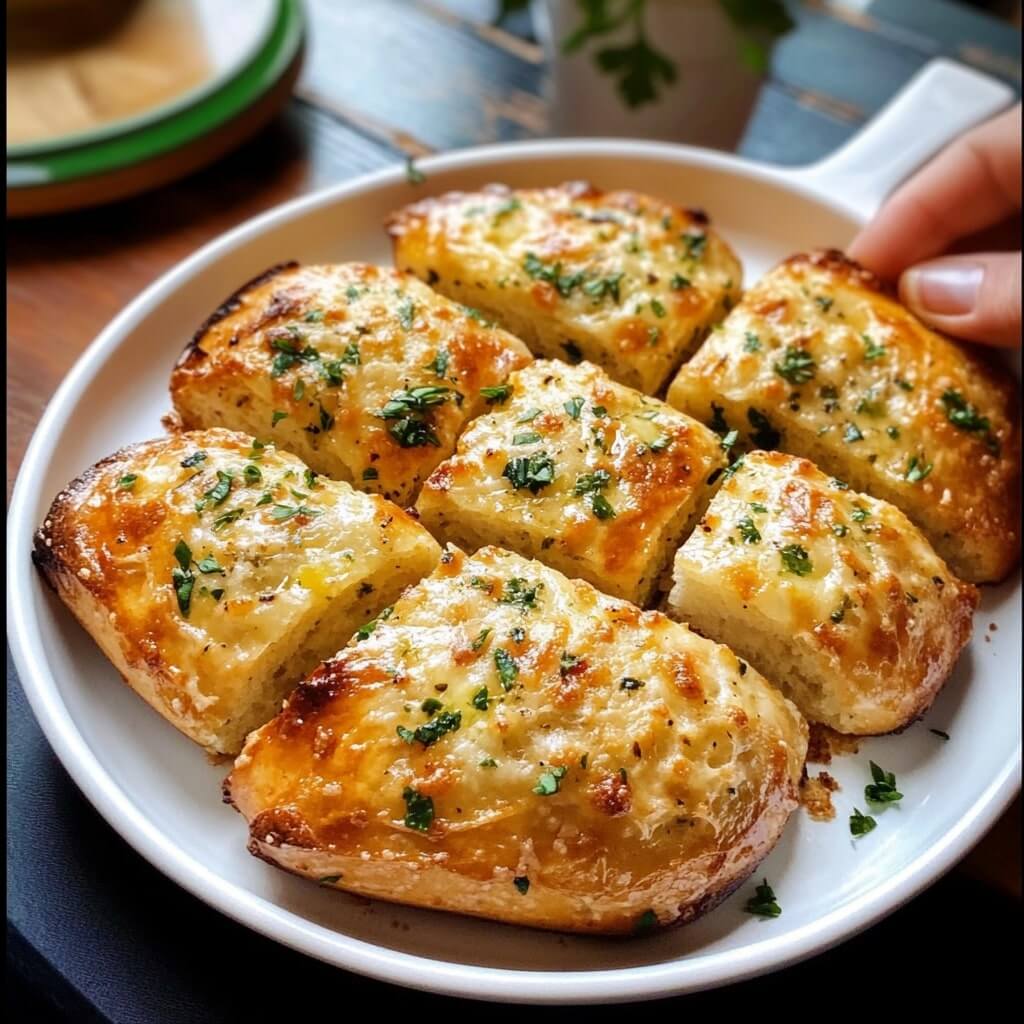
Once the garlic bread is golden brown and crispy, remove it from the air fryer and serve immediately. You can serve it as a side dish with pasta, soups, or even enjoy it as a snack on its own.
Air Fryer Garlic Bread: A Quick and Simple Side Dish That Impresses
Garlic bread is more than just a side dish—it’s a warm, comforting addition to any meal. From pasta nights to soups and stews, garlic bread’s garlicky aroma and crispy texture make it the perfect companion. With the air fryer, you can create golden, crispy, and buttery garlic bread in a fraction of the time it would take using a traditional oven. And the best part? It’s just as delicious, if not more!
In this guide, we’ll dive into the specifics of making Air Fryer Garlic Bread—why it works, the ingredients you need, and a foolproof method to achieve the perfect garlic bread every time. Whether you’re an experienced cook or a beginner, this recipe is easy to follow and delivers satisfying results that will have everyone asking for seconds.
What Makes Air Fryer Garlic Bread Different?
There’s no denying that garlic bread baked in the oven is tasty, but air fryer garlic bread takes it to a whole new level. The air fryer’s circulating hot air creates a crisp outer layer, while the inside stays tender and soft. You can achieve that desirable crunch without the need for extra oil, giving you a healthier version of the classic. Plus, the air fryer allows for faster cooking, cutting down the time from 15-20 minutes in the oven to just 5 minutes. It’s an ideal solution for those who want garlic bread in a hurry!
Here’s why air frying garlic bread is such a game-changer:
- Even crisping: The air fryer ensures an even golden crisp on all sides of the bread.
- Faster cook time: No preheating required—just 5 minutes to garlic bread perfection!
- Less mess: No need to heat up the entire oven or deal with greasy pans. The air fryer is self-contained, making cleanup a breeze.
- Perfect texture: The air fryer gives the bread a satisfying crunch without drying it out, thanks to its precise cooking method.
How to Choose the Best Bread for Garlic Bread in the Air Fryer
When it comes to making garlic bread, the bread you choose plays a significant role in the final result. The best garlic bread uses a hearty, crusty loaf to hold up to the garlic butter while still maintaining a soft, tender interior. Here are some great bread options for your air fryer garlic bread:
• French Baguette – A classic choice, baguettes are perfect for garlic bread because they have a sturdy crust and soft, airy interior. You can slice them easily into individual portions.
• Ciabatta – This rustic Italian bread works well with garlic butter and will deliver a chewy, airy interior and a slightly crispy crust.
• Sourdough – For a tangy twist, sourdough makes an excellent base for garlic bread. It’s dense, flavorful, and holds up well in the air fryer.
• Italian Bread – A soft, airy loaf with a crisp crust, perfect for soaking up the garlic butter without being too soggy.
You can also use frozen garlic bread in your air fryer! Just skip the garlic butter prep, and cook the frozen slices for 7-8 minutes. The result is just as delicious and crispy as homemade!
Air Fryer Garlic Bread: Key Ingredients Explained
While the ingredients for air fryer garlic bread are simple, each one plays a vital role in the final result. Here’s a breakdown of what you’ll need and why:
-
Butter (Salted or Unsalted): Butter is the star ingredient. It adds richness and ensures that the garlic bread becomes crispy and golden. Choose salted butter for a bolder, savory flavor, or unsalted butter if you prefer to control the seasoning.
-
Fresh Garlic: Freshly minced garlic is non-negotiable for this recipe. The raw garlic infuses the butter with its strong, aromatic flavor. Avoid using garlic powder, as it doesn’t provide the same punch of flavor.
-
Parsley: Fresh parsley adds a burst of color and a hint of earthiness. It also helps balance out the rich butter and garlic. If you don’t have fresh parsley on hand, dried parsley works fine as well.
-
Parmesan Cheese (Optional): While not essential, a sprinkle of freshly grated Parmesan cheese takes the garlic bread to the next level. It adds a salty, nutty flavor and helps create a crispy, golden crust.
Best Air Fryer Settings for Garlic Bread
To get the perfect garlic bread in your air fryer, it’s important to use the right settings. Here’s what you need to know:
• Temperature: Set your air fryer to 350°F (180°C). This is the ideal temperature for achieving a crispy exterior without overcooking the bread or making it too dry.
• Cooking Time: Depending on the thickness of your bread and the air fryer model, the cooking time will range from 4 to 5 minutes. Keep a close eye on it as cooking times can vary.
• Single Layer: To ensure even crisping, avoid overcrowding the basket. Place the slices in a single layer, leaving space between them for air circulation. You may need to cook the bread in batches if you’re making a large amount.
How to Make Air Fryer Garlic Bread: Step-by-Step
Let’s dive into the process of making Air Fryer Garlic Bread. It’s quick, easy, and doesn’t require any fancy equipment. Follow these simple steps for delicious results!
Step 1: Prepare the Garlic Butter
In a mixing bowl, combine softened butter with minced garlic, chopped parsley, and grated Parmesan cheese (if using). Stir until the ingredients are well-mixed and the butter is fully infused with garlic flavor.
Step 2: Slice Your Bread
Slice your baguette (or other choice of bread) into 1 to 2-inch thick slices. You can cut them diagonally for a more rustic, attractive presentation.
Step 3: Spread the Garlic Butter
Generously spread the garlic butter mixture onto each slice of bread, making sure the entire surface is covered. You can go as heavy-handed as you like, but the more butter, the more flavorful your garlic bread will be!
Step 4: Preheat the Air Fryer
Preheat your air fryer to 350°F (180°C). While some air fryers don’t require preheating, doing so ensures an even, crispy result.
Step 5: Air Fry the Garlic Bread
Place the buttered bread slices in the air fryer basket. Be sure not to overcrowd the basket. Cook the garlic bread for 4 to 5 minutes or until golden and crispy. Keep an eye on the bread to ensure it doesn’t burn.
Step 6: Serve and Enjoy
Once the garlic bread is golden brown and crispy, remove it from the air fryer and serve it immediately. Enjoy it alongside pasta, soups, or simply on its own with a dipping sauce.
Tips for Perfect Air Fryer Garlic Bread Every Time
Now that you know how to make Air Fryer Garlic Bread, let’s go over a few tips and tricks to ensure you get the best results every time. These simple adjustments can make a big difference in flavor, texture, and overall satisfaction.
1. Use Room Temperature Butter
For the best spreadability, always use softened butter at room temperature. Cold butter is hard to work with and won’t melt into the bread as effectively. Softened butter allows for a smooth garlic butter mixture, ensuring that every slice of bread gets a generous coating.
2. Don’t Skip the Preheat
Preheating your air fryer may seem like an extra step, but it ensures that the garlic bread cooks evenly from the start. If your air fryer doesn’t require preheating, simply let it run for a minute or two before placing your bread inside.
3. Experiment with Cheese
While Parmesan cheese adds a wonderful golden crust and extra flavor, feel free to get creative with your cheese choices. Mozzarella, cheddar, or even a combination of cheeses can bring a new depth of flavor to your garlic bread. For a melty, cheesy garlic bread experience, top each slice with a little shredded mozzarella during the last minute of cooking.
4. Season with a Pinch of Salt
Depending on the butter you use, the garlic bread may need a pinch of salt to balance the flavors. If you’re using unsalted butter, a little extra salt can elevate the overall taste. Taste the garlic butter before spreading it to ensure it’s just right!
5. Go for Fresh Garlic
While it might be tempting to use garlic powder, fresh garlic is the secret ingredient that gives this recipe its bold, fresh flavor. Fresh garlic offers a stronger, more aromatic taste that complements the butter perfectly. Be sure to mince it finely to avoid large, overpowering chunks.
6. Don’t Overcrowd the Air Fryer Basket
For the crispiest garlic bread, don’t overcrowd the air fryer basket. The hot air needs to circulate around each slice to create that golden crunch. If you’re making a large batch, cook the slices in batches to ensure even cooking.
7. Add Herbs for Extra Flavor
Fresh herbs like thyme or rosemary can enhance the flavor of your garlic bread. Try adding a little chopped thyme to the butter mixture for a fragrant, savory twist. Fresh basil also pairs well with garlic bread, especially if you’re serving it alongside Italian dishes.
How to Store and Reheat Air Fryer Garlic Bread
If you have any leftover garlic bread, don’t worry—you can store it for later. Here’s how to keep your air fryer garlic bread fresh:
Storing Garlic Bread
-
In the fridge: Store leftover garlic bread in an airtight container in the fridge for up to 3-4 days. It’s best enjoyed fresh, but it will still taste great for a few days if stored properly.
-
In the freezer: To store garlic bread for a longer period, wrap it tightly in plastic wrap or place it in a freezer-safe ziplock bag. It will stay fresh in the freezer for up to 2 months.
Reheating Garlic Bread
-
In the air fryer: The air fryer is the best way to reheat garlic bread without sacrificing crispiness. Simply place the garlic bread in the air fryer basket and cook at 350°F (180°C) for 2-3 minutes. This will bring back its golden crispness and warm, buttery flavor.
-
In the oven: Preheat your oven to 350°F (180°C), and place the garlic bread on a baking sheet. Heat for 5-7 minutes until the bread is crispy and warm. You can cover the bread with aluminum foil to prevent it from drying out.
Pro Tip: You can also reheat frozen garlic bread straight from the freezer! Just air fry it at 350°F (180°C) for 5-6 minutes, and you’ll have crispy, fresh garlic bread in no time.
FAQs About Air Fryer Garlic Bread
If you’re new to cooking garlic bread in the air fryer, you may have a few questions. Let’s answer some of the most common ones.
How long does it take to make air fryer garlic bread?
Air fryer garlic bread takes just 5 minutes to cook once you’ve prepared the bread. This is much faster than using a conventional oven, which can take up to 15-20 minutes. Preheat your air fryer for a minute or two, and your garlic bread will be ready in no time!
Can I use frozen garlic bread in the air fryer?
Absolutely! You can cook frozen garlic bread in the air fryer. Simply place the frozen slices in the basket and air fry at 350°F (180°C) for 7-8 minutes, or until crispy and golden. No need to thaw—it’s that easy!
Can I make garlic bread with other types of bread?
Yes, you can make garlic bread with ciabatta, sourdough, or even regular sandwich bread. Choose a loaf that has a good crust and a soft interior. The air fryer will create the perfect balance of crispy edges and a tender center, no matter what bread you use.
Is it possible to make vegan garlic bread in the air fryer?
Yes! You can make vegan garlic bread by swapping out the butter for a plant-based alternative, like margarine or olive oil. Ensure that your bread is also vegan-friendly, and you’ll have a delicious dairy-free garlic bread.
Can I add other toppings to my garlic bread?
Of course! You can get creative with your toppings. Try adding a sprinkle of mozzarella cheese, a drizzle of olive oil, or even some sundried tomatoes. You can also experiment with spices like red pepper flakes or oregano for a bit of heat or extra flavor.
Final Thoughts
If you haven’t already, it’s time to try making Air Fryer Garlic Bread. Whether you’re in a rush or just craving something comforting, this easy recipe will not disappoint. The air fryer’s ability to cook the bread quickly, with a perfect balance of crispy edges and soft interiors, makes it a standout recipe for any occasion. Plus, it’s so versatile—you can tweak the recipe to suit your tastes or even make it your own signature dish.
So, what are you waiting for? Gather your ingredients and get ready for garlic bread perfection in just five minutes. Your taste buds will thank you!


