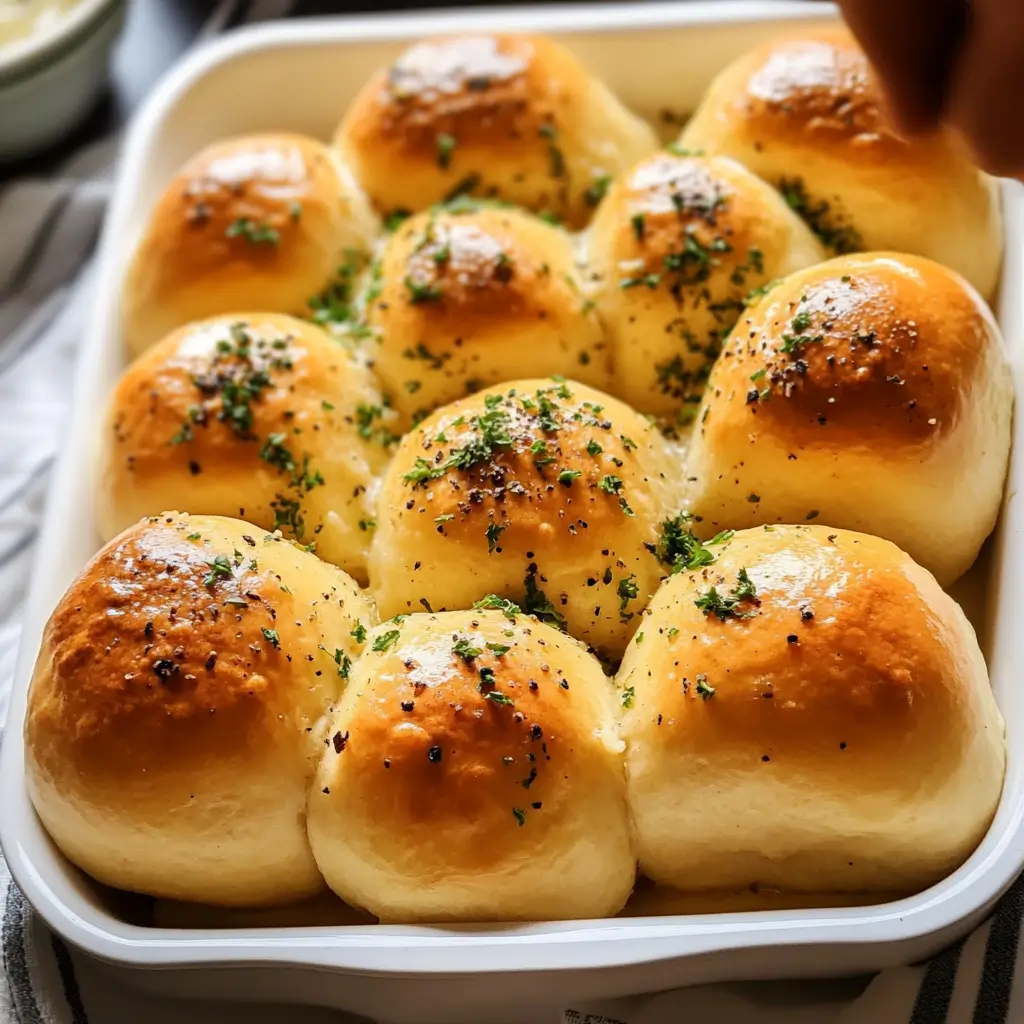
There’s nothing quite like the warm, irresistible smell of fresh bread baking in the oven. And when that bread is infused with the rich flavors of garlic and butter, you know you’re in for a treat. Garlic Butter Bread Rolls are soft, fluffy, and bursting with savory goodness—perfect for any dinner table or holiday feast.
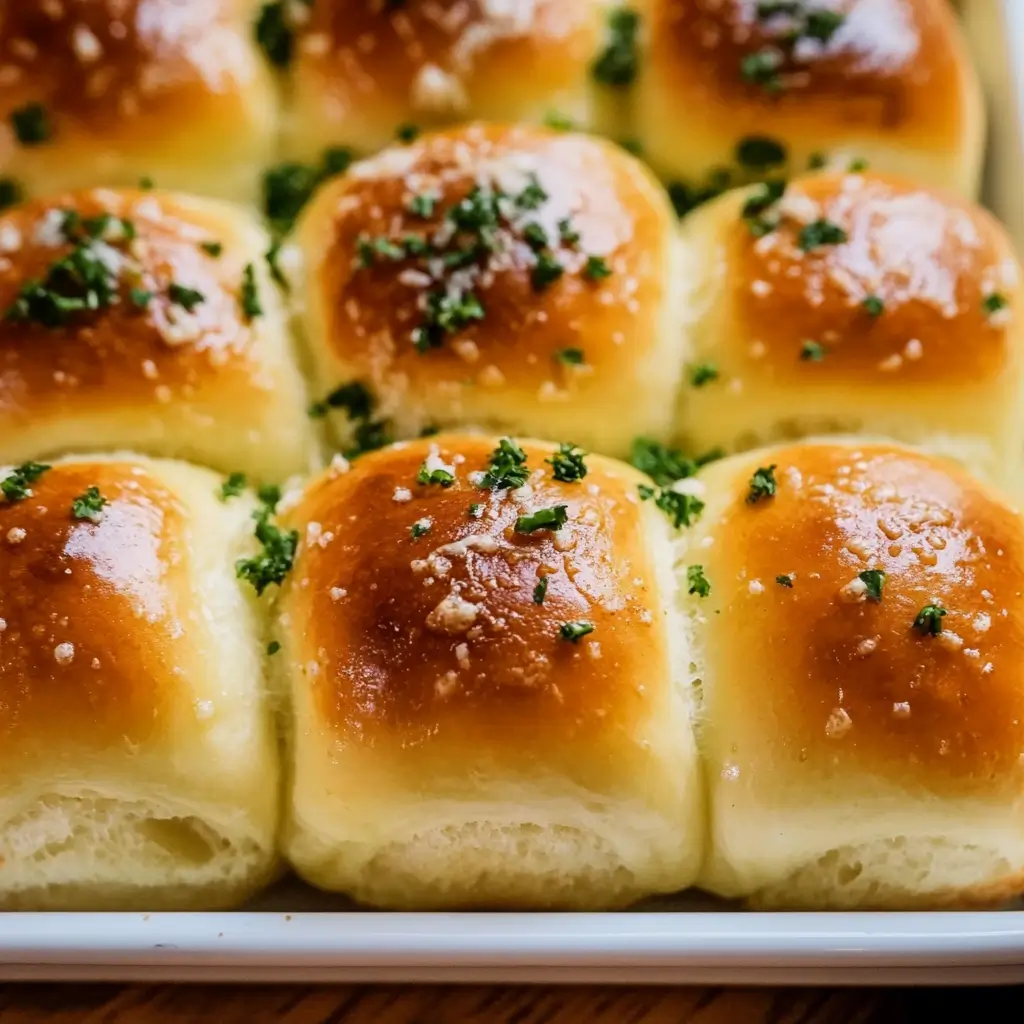
These rolls are packed with fresh garlic in the dough, topped with a luscious garlic herb butter after baking, making them a flavorful side that complements almost any meal. Whether you’re having a casual family dinner or hosting a holiday gathering, these rolls are sure to be a hit.
Why You’ll Love Garlic Butter Bread Rolls
- Fluffy and Soft: These rolls are irresistibly soft and light, with the perfect fluffy texture.
- Packed with Flavor: Fresh garlic in the dough and garlic butter on top give these rolls a deep, savory flavor.
- Easy to Make: While they might seem like a special treat, these rolls are simple to make and require basic ingredients.
- Customizable: Add your favorite herbs, cheeses, or seasonings to personalize the rolls to your taste.
- Perfect for Any Occasion: Serve these rolls as a side dish at family dinners, holiday meals, or casual get-togethers. They’re versatile and crowd-pleasing!
Ingredients for Garlic Butter Bread Rolls
Before diving into the recipe, let’s take a look at the ingredients you’ll need for these flavorful garlic butter bread rolls:
For the Dough:
- All-purpose flour: This is the base of the dough, giving it structure and texture.
- Instant yeast: This quick-rising yeast ensures soft and fluffy rolls without the wait of traditional yeast.
- Granulated sugar: A small amount of sugar helps activate the yeast and balances the savory flavors.
- Fine sea salt: Adds flavor to the dough and balances out the sweetness of the sugar.
- Warm milk: Acts as a liquid to activate the yeast and make the dough soft.
- Egg: Provides structure and helps the dough rise, giving the rolls their fluffy texture.
- Garlic butter: Fresh garlic and butter create the base for the flavor infusion in the dough.
For the Garlic Butter:
- Unsalted butter: Adds a rich, creamy texture for the garlic butter, which coats the rolls after baking.
- Minced garlic: Fresh garlic brings that savory, aromatic flavor to the rolls.
- Chopped parsley: Fresh parsley adds a pop of color and a hint of herbal freshness to the garlic butter.
- Flaky sea salt: For finishing the rolls with a touch of salt that enhances the garlic butter flavor.

Step-by-Step Instructions
Now that you have your ingredients ready, let’s dive into making these delicious garlic butter bread rolls.
Step 1: Prepare the Garlic Butter
Start by making the garlic butter, as this will be brushed onto the rolls after baking. Here’s how to do it:
- In a small saucepan, melt 4 1/2 tablespoons of unsalted butter.
- Add 2 tablespoons of minced garlic and cook over medium heat for about 1-2 minutes, or until the garlic is fragrant.
- Remove the saucepan from the heat and set it aside to cool.
Step 2: Combine the Dry Ingredients
In a stand mixing bowl, combine the dry ingredients:
- 3 1/2 cups + 1 tablespoon of all-purpose flour
- 1 tablespoon of granulated sugar
- 2 1/4 teaspoons of instant yeast
- 1 teaspoon of fine sea salt
- 3 tablespoons of chopped fresh parsley (optional, but it adds extra flavor)
Mix these dry ingredients well until everything is evenly distributed.
Step 3: Add Wet Ingredients and Knead the Dough
- Warm 1 cup of whole or 2% milk in the microwave or on the stove to about 110°F (warm to the touch).
- Add the warm milk, 1 large egg, and the cooled garlic butter (reserve a little bit for brushing the rolls later).
- Using the dough hook on your stand mixer, mix the dough on low speed until it comes together into a soft, tacky ball. If the dough feels too sticky, gradually add 1 tablespoon of flour at a time until it becomes workable.
- Knead for 10-12 minutes until the dough is smooth and elastic.
Step 4: Shape the Dough Into Rolls
- Once the dough is kneaded, turn it out onto a lightly floured surface.
- Cut the dough into 12 equal portions. You can use a kitchen scale for accuracy—each portion should weigh about 67 grams.
- Shape each portion into a smooth ball by cupping your hand around the dough and rolling it in a clockwise motion, pinching the seam tightly at the bottom.
- Arrange the shaped rolls into a buttered 9×13-inch baking pan.
Step 5: Let the Dough Rise
Cover the pan with plastic wrap or a clean kitchen towel and place it in a warm spot to rise. Allow the dough to double in size, which should take about 1-2 hours.
Step 6: Bake the Rolls
- Preheat the oven to 350°F (180°C).
- Once the rolls have risen, brush the tops with a beaten egg wash to give them a golden, glossy finish.
- Bake the rolls for about 20-30 minutes or until they are golden brown and cooked through.
Step 7: Brush with Garlic Butter
While the rolls are baking, prepare the garlic butter. Once the rolls are out of the oven, immediately brush them with the warm garlic butter you prepared earlier. Sprinkle with flaky sea salt if desired.
Serve the rolls warm and enjoy their soft, buttery goodness!
Tips for Perfect Garlic Butter Bread Rolls
- Use a kitchen scale: Weighing your dough ensures uniform rolls and even baking.
- Don’t rush the rising time: Giving the dough time to rise is crucial for fluffy rolls.
- Add cheese: For a cheesy twist, sprinkle shredded mozzarella or Parmesan on top before baking.
- Make them ahead: Once shaped, you can refrigerate the rolls overnight. Let them rise at room temperature before baking.
Storage, Freezing, Make-Ahead, and Reheating
These garlic butter bread rolls are best served fresh, but you can easily store them or prepare them ahead of time for convenience. Here’s how you can extend the shelf life or get a jump start on your meal prep.
Storage:
- At room temperature: These rolls can be stored for 2-3 days in an airtight container or a ziplock bag. Be sure to allow them to cool completely before storing to prevent condensation and sogginess.
Freezing:
- Before baking: If you want to make these rolls in advance, you can freeze the shaped dough after it has risen. Place the rolls on a baking sheet in a single layer and freeze until solid. Transfer them to an airtight container or freezer bag. When ready to bake, let them thaw in the refrigerator overnight, then let them rise at room temperature before baking.
- After baking: Once baked, let the rolls cool completely. Store them in an airtight container or freezer bag for up to one month. Reheat by wrapping the rolls in foil and baking at 350°F (180°C) for about 10 minutes.
Make-Ahead:
- Shaped dough: Once you’ve shaped the rolls, you can cover them tightly with plastic wrap and refrigerate them overnight. Let the dough rise at room temperature for 2-3 hours before baking.
- Garlic butter: You can prepare the garlic butter ahead of time and store it in the refrigerator for up to a week.
Reheating:
- Oven: To reheat your garlic butter bread rolls, cover them with foil and bake at 350°F (180°C) for 10-15 minutes or until warm.
- Microwave: If you’re short on time, microwave the rolls for 20-30 seconds until they’re warm.
Why Are These Garlic Butter Bread Rolls So Special?
These garlic butter bread rolls stand out because they offer the perfect balance of fluffiness, garlic richness, and savory flavor. The use of fresh garlic both in the dough and the garlic butter ensures that every bite is bursting with flavor. These rolls are not just side dishes; they are the stars of the meal. Whether paired with a hearty soup, a festive holiday dinner, or enjoyed on their own, they bring a comforting, indulgent touch to any occasion.
Nutritional Benefits of Garlic Butter Bread Rolls
While these rolls are undeniably delicious, they’re also packed with nutritional value from simple, wholesome ingredients:
- Flour: Provides essential carbohydrates and energy.
- Garlic: Rich in antioxidants and known for its heart-healthy benefits.
- Butter: Offers healthy fats, essential for brain function.
- Parsley: Adds vitamins A and C, and is a natural anti-inflammatory.
- Yeast: Supports digestive health and adds a subtle umami flavor to the bread.
1. Easy to Customize:
Feel free to get creative with your garlic butter bread rolls. You can add cheese or herbs like rosemary or thyme to the dough for an extra layer of flavor. For a kick of spice, sprinkle a little red pepper flakes into the garlic butter before brushing it on the rolls. You could even try adding a bit of grated Parmesan on top before baking for a cheesy crust.
Tips for Perfecting Your Garlic Butter Bread Rolls
Making the perfect garlic butter bread rolls is not just about following the recipe—it’s about mastering the process. Here are some extra tips to ensure your rolls come out perfectly every time.
1. Use Fresh Ingredients
- Fresh garlic: For the best flavor, always use fresh garlic cloves instead of pre-minced garlic or garlic powder. Fresh garlic gives the rolls a stronger, more aromatic flavor.
- High-quality butter: When the ingredients are so simple, the quality matters. Opt for unsalted butter from a reputable brand like Kerrygold for a richer, creamier result.
2. Control the Temperature of Your Dough
- Warm environment for rising: Yeast is the magic behind soft, fluffy rolls. Make sure your dough rises in a warm spot, like near an oven or in a slightly warmed oven. The ideal temperature for rising dough is around 75°F (24°C).
- Don’t overwork the dough: When kneading, be gentle. Over-kneading can lead to dense rolls. Just knead until the dough is smooth and elastic.
3. Brush Rolls with Garlic Butter Immediately After Baking
- The secret to making garlic butter bread rolls extra flavorful is brushing them with garlic butter right after they come out of the oven. The hot rolls will soak up the buttery garlic goodness, giving them an irresistible flavor.
4. Shape Your Rolls Evenly
- For perfectly uniform rolls, consider using a kitchen scale to divide the dough into equal portions. This ensures that each roll bakes at the same rate and you get consistent results every time.
5. Be Patient with the Rising Time
- Don’t rush the rise! Letting your dough rise until it doubles in size is essential to achieving the fluffy texture you want in your bread rolls. This could take anywhere from 1 to 2 hours, so be patient and let the dough do its magic.
6. Try Adding Some Cheese for Extra Flavor
- For a cheesy twist, sprinkle some shredded mozzarella or Parmesan cheese on top of the rolls before baking. The cheese will melt and create a crispy, cheesy top layer that complements the garlic butter perfectly.
Pairing Garlic Butter Bread Rolls with Your Favorite Dishes
These garlic butter bread rolls are versatile and pair well with a variety of meals. Here are some of the best dishes to serve them with:
1. Hearty Soups
- These bread rolls go perfectly with cream-based soups like tomato bisque or potato leek soup. The softness of the rolls pairs wonderfully with the rich, creamy texture of these soups.
2. Pasta Dishes
- Serve them alongside your favorite pasta dishes such as spaghetti or lasagna. The garlic butter will complement the hearty tomato sauces or cheesy pasta layers.
3. Grilled Meats
- If you’re grilling steaks, chicken, or pork, these rolls make the ideal side dish. The buttery, garlicky flavor enhances the grilled meats without overpowering them.
4. Holiday Meals
- These garlic butter bread rolls are an excellent side dish for holiday meals like Thanksgiving, Christmas, or Easter. Pair them with roast turkey, baked ham, or a vegetarian main dish for a satisfying meal.
5. Salads
- For a lighter meal, enjoy these rolls with a fresh salad. They add a comforting touch to leafy greens, roasted vegetables, or even a grain-based salad.
Troubleshooting Common Issues with Garlic Butter Bread Rolls
While these garlic butter bread rolls are easy to make, there are a few common problems you might run into. Here’s how to troubleshoot:
1. My Rolls Are Too Dense
- If your rolls are dense, it could be due to over-flouring the dough. Measure your flour correctly by fluffing it with a fork and spooning it into the measuring cup, or use a kitchen scale for accuracy. Also, ensure your dough has risen long enough for a light, fluffy texture.
2. The Rolls Didn’t Rise Properly
- If the dough doesn’t rise as expected, it could be that the yeast didn’t activate properly. Make sure your yeast is fresh and that the milk is warm (not hot). If it’s too hot, it can kill the yeast.
3. The Garlic Butter Burned
- Garlic can burn easily, so be careful not to cook it for too long when making the garlic butter. Cook the garlic just enough to release its flavor, about 1-2 minutes, and be sure to remove it from the heat immediately.
4. Rolls Came Out Too Dry
- If your rolls came out dry, you may have added too much flour or overbaked them. To ensure the right consistency, always check your dough before baking—it should be soft and slightly tacky but not too sticky. Also, monitor the baking time closely; when they’re golden brown, they’re done.
FAQs on Garlic Butter Bread Rolls
Is it better to butter rolls before or after baking?
It’s generally better to butter the rolls after baking. This allows the butter to soak into the warm rolls, giving them a richer flavor and ensuring they stay soft and fluffy. Brushing them with butter immediately after baking also adds a glossy, appealing finish. However, if you prefer a crispier top, you can also brush the rolls with butter before baking, especially if you want the butter to form a slightly golden crust.
How do you turn bread rolls into garlic bread?
To turn bread rolls into garlic bread, simply slice the rolls into halves or quarters, depending on their size. Prepare a garlic butter mixture by combining melted butter, minced garlic, and herbs like parsley. Spread the garlic butter generously over the cut sides of the rolls. Bake the rolls in a preheated oven at 350°F (175°C) for about 10-12 minutes until the tops are golden and crispy. For extra flavor, you can add a sprinkle of grated cheese before baking.
What kind of bread is used for garlic bread?
For garlic bread, Italian bread, French bread, or baguettes are commonly used because of their soft texture and ability to hold up to the garlic butter without becoming too soggy. Dinner rolls or sourdough can also be used if you’re looking to make a unique twist on garlic bread. These breads have the perfect balance of softness and structure to absorb the garlic butter and create a deliciously crunchy crust when baked.
How to make buttered garlic bread?
To make buttered garlic bread, begin by preparing a garlic butter spread. Mix together unsalted butter, minced garlic, and a pinch of salt. You can also add fresh parsley or Parmesan cheese for extra flavor. Spread this garlic butter mixture generously over the surface of your bread slices. Bake the slices in the oven at 375°F (190°C) for 10-12 minutes until the edges are golden and crispy. For extra flavor, broil the bread for 1-2 minutes at the end.
Can I add cheese to my garlic butter bread rolls?
Yes! Adding cheese to your garlic butter bread rolls is a great way to enhance their flavor. You can sprinkle shredded Parmesan, Mozzarella, or Cheddar on top of the rolls just before baking. The cheese will melt into the garlic butter and form a delicious, gooey topping. If you want a cheesy garlic bread effect, you can also slice the rolls in half and bake them with the garlic butter and cheese spread on top.

Garlic Butter Bread Rolls Recipe Card
Ingredients
For the Dough:
- 3 1/2 cups all-purpose flour
- 1 tablespoon granulated sugar
- 2 1/4 teaspoons instant yeast
- 1 teaspoon fine sea salt
- 3 tablespoons chopped fresh parsley (optional)
- 1 cup whole or 2% milk, warmed to 110°F
- 1 large egg, room temperature
- 4 1/2 tablespoons unsalted butter, melted
- 2 tablespoons minced garlic (for dough)
For the Garlic Butter:
- 2 tablespoons unsalted butter
- 1 tablespoon minced garlic
- 1 tablespoon chopped fresh parsley
- Flaky sea salt (for finishing)
Instructions
- Prepare the Garlic Butter:
- In a small saucepan, melt 4 1/2 tablespoons of unsalted butter. Add 2 tablespoons of minced garlic and cook over medium heat for 1-2 minutes, until fragrant.
- Remove from heat and set aside to cool.
- Combine Dry Ingredients:
- In a large mixing bowl or stand mixer, combine 3 1/2 cups all-purpose flour, 1 tablespoon sugar, 2 1/4 teaspoons instant yeast, 1 teaspoon salt, and 3 tablespoons chopped parsley (if using). Mix to combine.
- Add Wet Ingredients:
- Add 1 cup of warm milk, the cooled garlic butter, and 1 large egg into the dry mixture. Mix until the dough starts to come together.
- Knead the Dough:
- Use the dough hook attachment on a stand mixer or knead by hand for 10-12 minutes until the dough is smooth, elastic, and slightly tacky. If the dough is too sticky, gradually add 1 tablespoon of flour at a time until it’s manageable.
- Shape the Rolls:
- Divide the dough into 12 equal portions (use a kitchen scale for accuracy). Roll each portion into a smooth ball, pinching the seam tightly at the bottom.
- Arrange the shaped rolls into a buttered 9×13-inch baking pan.
- Let the Dough Rise:
- Cover the pan with plastic wrap or a clean kitchen towel and place it in a warm area. Let the dough rise until it doubles in size, about 1-2 hours.
- Bake the Rolls:
- Preheat the oven to 350°F (180°C).
- Brush the tops of the rolls with a beaten egg wash.
- Bake for 20-30 minutes or until the rolls are golden brown.
- Brush with Garlic Butter:
- While the rolls are baking, make the garlic butter by melting 2 tablespoons unsalted butter in a saucepan and adding 1 tablespoon minced garlic. Cook for 1-2 minutes until fragrant, then stir in 1 tablespoon chopped parsley.
- Once the rolls are out of the oven, immediately brush them with the garlic butter mixture. Sprinkle with flaky sea salt if desired.
Notes
- Storage: These rolls are best served fresh but can be stored in an airtight container at room temperature for 2-3 days.
- Freezing: After baking, let the rolls cool completely, then store them in an airtight container or freezer bag for up to 1 month. Reheat in the oven at 350°F (180°C) for about 10 minutes before serving.
- Make-Ahead: You can shape the dough, place it in the baking pan, and refrigerate overnight. Allow it to rise at room temperature for 2-3 hours before baking.
Nutritional Facts (per serving, assuming 12 servings)
- Calories: 220 kcal
- Protein: 4g
- Fat: 10g
- Carbohydrates: 28g
- Fiber: 1g
- Sugar: 2g
- Sodium: 270mg


